Here is a quick inverted shot from a short session last night on Comet PANSTARRS. It was a bit hazy and not really enough subs used hence more noise than the usual mess.

| ASTROPAZ |
|
|
Here is a quick inverted shot from a short session last night on Comet PANSTARRS. It was a bit hazy and not really enough subs used hence more noise than the usual mess.
0 Comments
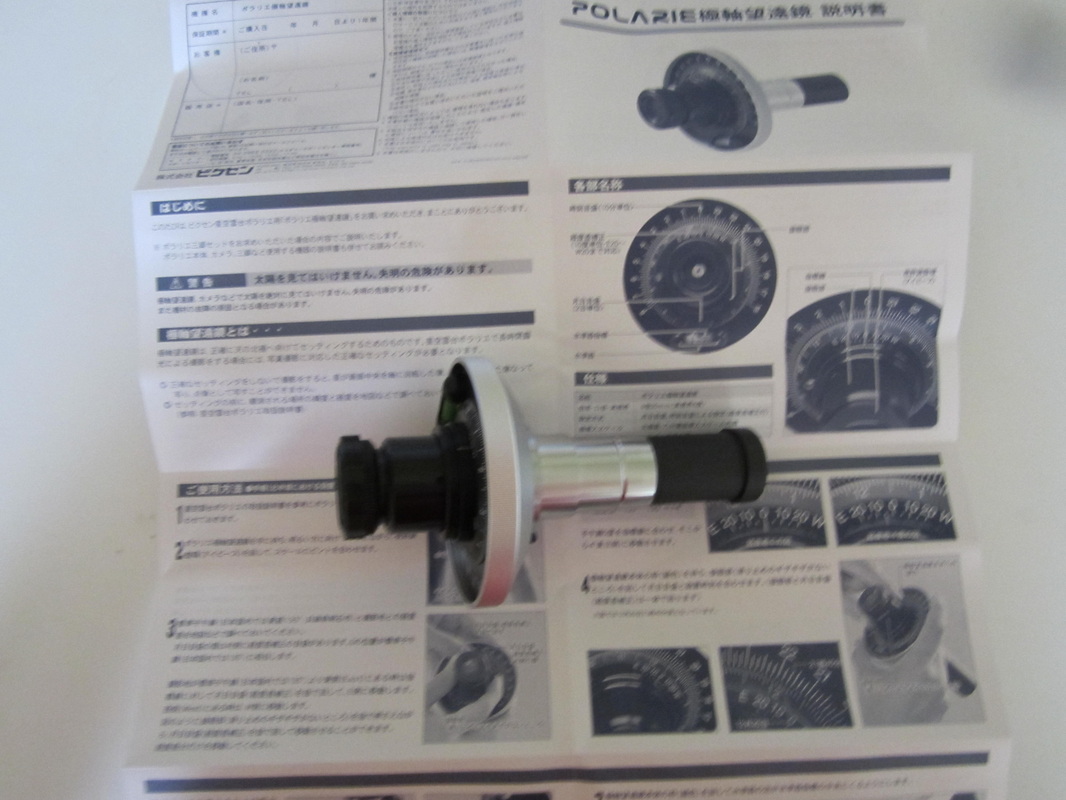
What does the Polarie do? Basically it allows the user to take spectacular long exposure photographs of the night sky while keeping the stars as small, sharp pin-points of light using a basic camera and lens set up. Why is this innovative? Mainly because of the Polarie's small size and ease of use, up until recently to accurately track the heavens you would of been using a German equatorial mount or home-made barn door tracker which are both excellent options but can be a bit bulky and not so portable, the Polarie gives you the opportunity to carry all the gear needed in a backpack with room left over for drinks and snacks. It also runs for 2 hours on AA batteries which makes it very easy to carry a few spares.
I will say though that choosing a good sturdy tripod is essential, if you already own a lightweight one then think about upgrading it as having used the Polarie on a number of tripods the small and light one caused me the most grief and was too susceptible to movement and shake. When I use it at home I now put it on an EQ-2 with a wooden tripod and that set up is rock solid. As an optional extra the Polarie also has it's own polar scope for an accurate polar alignment, this is not an essential piece of kit as there is a sight hole which allows you to eye ball Polaris and make a rough alignment which in itself is surpisingly accurate and will give you great pin point stars with lenses of 50mm and less for minutes at a time. The polar scope does take a lot of guess work out of it though and will achieve longer tracking times when aligned perfectly. However polar aligning in the Southern hemisphere can be a bit tricky as there is no bright star like there is in the North so you use Octans instead, this is expained in detail in the manual and is also marked on the polar scope. There is also a hotshoe mounted compass and latitude meter to aid in alignment called the Polar Meter.
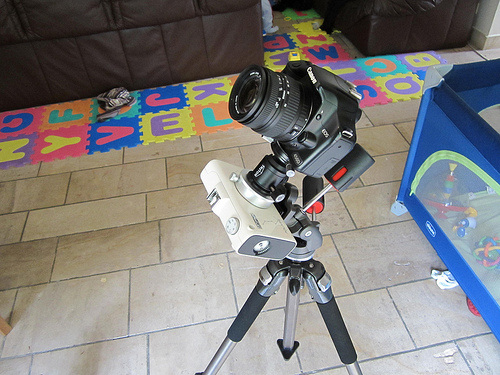
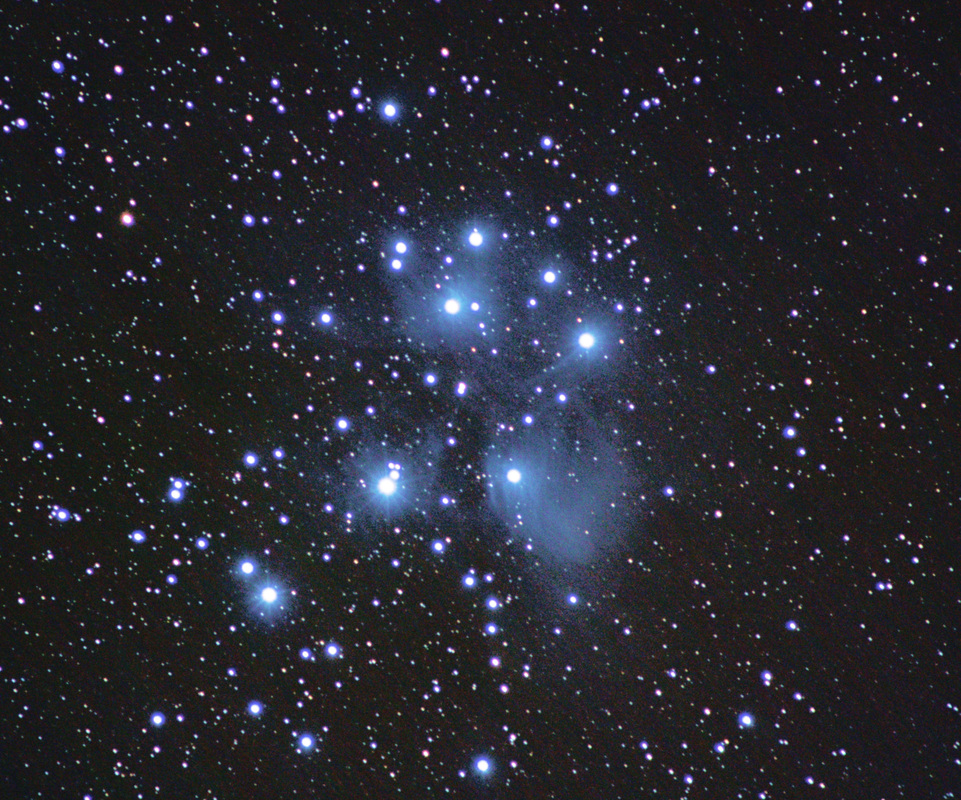
Setting up and then using the Polarie is a satisfyingly easy task and once you have done it a couple of times it should take around 5 minutes in total. I'll give a brief explanation of the process. Firstly you will want to set your tripod up and level it, preferably on solid ground so it doesn't shake or slip in the dirt. Then at the base of the Polarie locate the standard 1/4" screw thread which is used to screw the Polarie to your tripod head plate or ballhead. At this point you can either attach your second ballhead and camera to the silver mounting block in the front of the unit and align the mount via the sight hole or you can remove the mounting block and place in the polar scope(this can be a bit fiddly so care should be taken not to bump the alignment when replacing the block and camera). Once you have all the components in place and aligned your set up should look similar to the one in the second picture I posted above. From here you are ready to aim your camera and to switch the Polarie on, set it to the "Star" mode and start imaging. Simples, although I know I have probably over simplified it for this post and maybe missed a few things but the basics are all there and you do get full instructions with the Polarie. 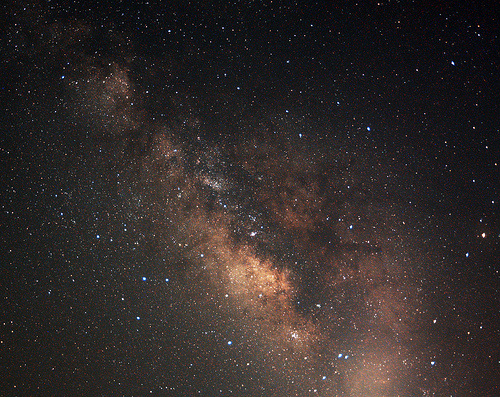 The Milky Way. One of the first pictures I took with the Polarie, this was a stack of a number of 130 second exposures with an 18mm lens. How well does the Polarie perform? As you can see by some of the pictures posted it performs really, really well, imagine what it can do in the hands of someone who knows what they are doing. There is always going to be limitations for a device like this but it does exactly what it states it does and to a degree even out performs Vixens own guides. When using a 18 or 50mm lens I can easily achieve 5 minute exposures before light pollution takes over the image and it is this LP that has set the limits for me, if I had pure dark skies then no doubt I would be able to take longer exposures still. I have also used my 75-300mm zoom lens and at 300mm I can still quite easily manage 1 minute exposures which according to the guide in the manual(see below) is not even on the scale. 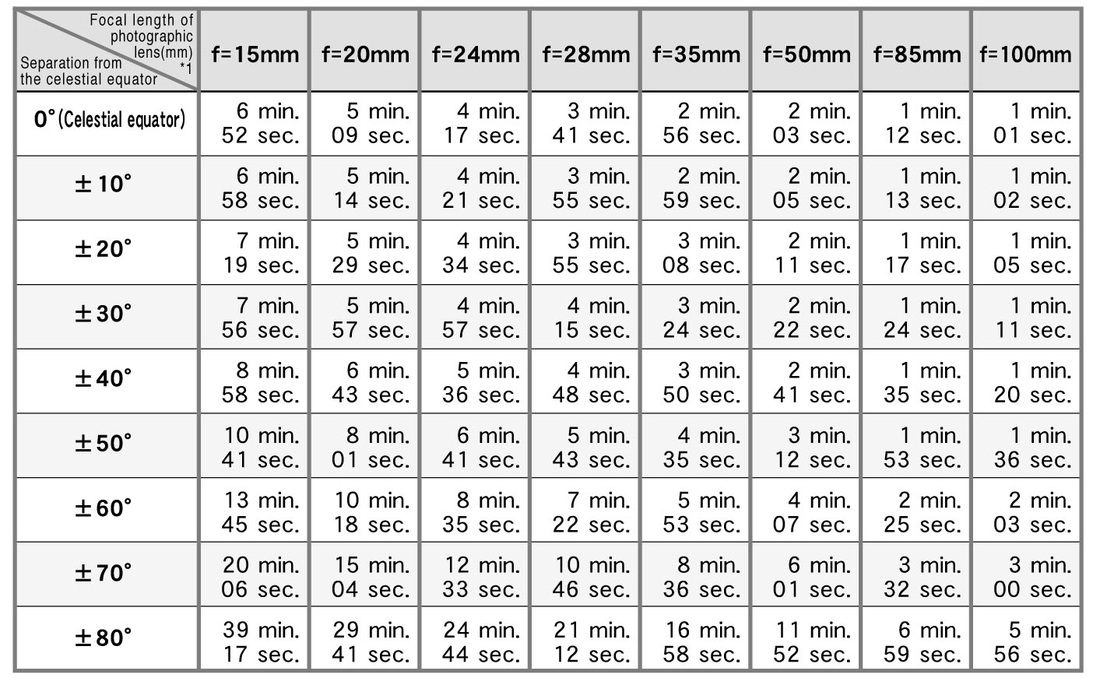
I also think that it is worth going over the listed specifications of the Polarie as these are the first thing potential buyers look at and I get the feeling Vixen have understandably been a little conservative in some areas plus I have my own observations to add. 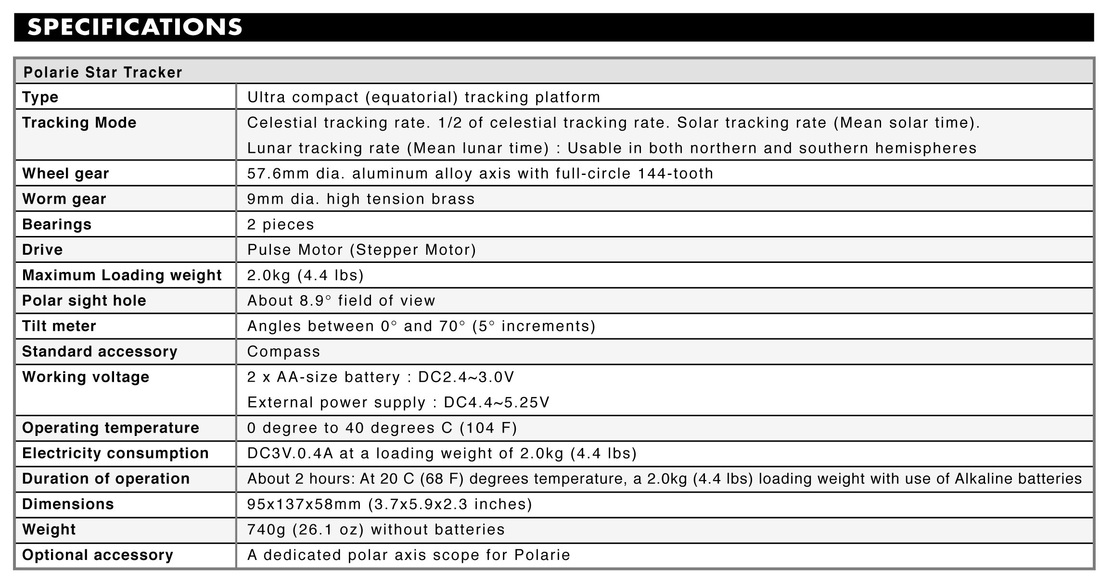 Polarie specifications, sorry about the size. The first thing I'd like to address is the maximum loading weight, something that has come under some criticism from potential buyers. The manual that goes out in the EU states a max load of 2kg(4.4lbs) but in the U.S it states a revised limit of 7lbs. Like I said, I think the original 4.4lb estimate is rather conservative as 7lbs really does seem closer to the mark and that is the number I would prefer to quote. I have seen a number of set ups with small refractors being used on it with success and some of these go well over the 4.4 limit. Personally I'm looking into a small frac myself, if I ever get one I will endeavour to post some results. The other thing that stands out to me is the battery life, the quoted 2 hours is actually pretty close to spot on but there are times when I have had easily 4 hours of life from the batteries, they have certainly outlasted my dslr battery. However this isn't always the case, I put the sometimes increased battery life down to the quality of the AA batteries used and how much load you are putting on the Polarie. Either way more battery life is a bonus, but just because I said it doesn't mean you will get it. Expect 2 hours and you're on a winner. All in all the Polarie is an excellent bit of kit and one that I couldn't imagine being without. Why should you choose a Polarie and not one of the other trackers that are on the market? This is a good question and without having used any of the Polaries competitors(I'm more than willing to test and review one if I can try one) is hard to answer. All I can say is that when you buy Vixen you are getting a quality product and service and the Polarie is no exception, you know you are getting a top product and frankly I feel the results speak for themselves. 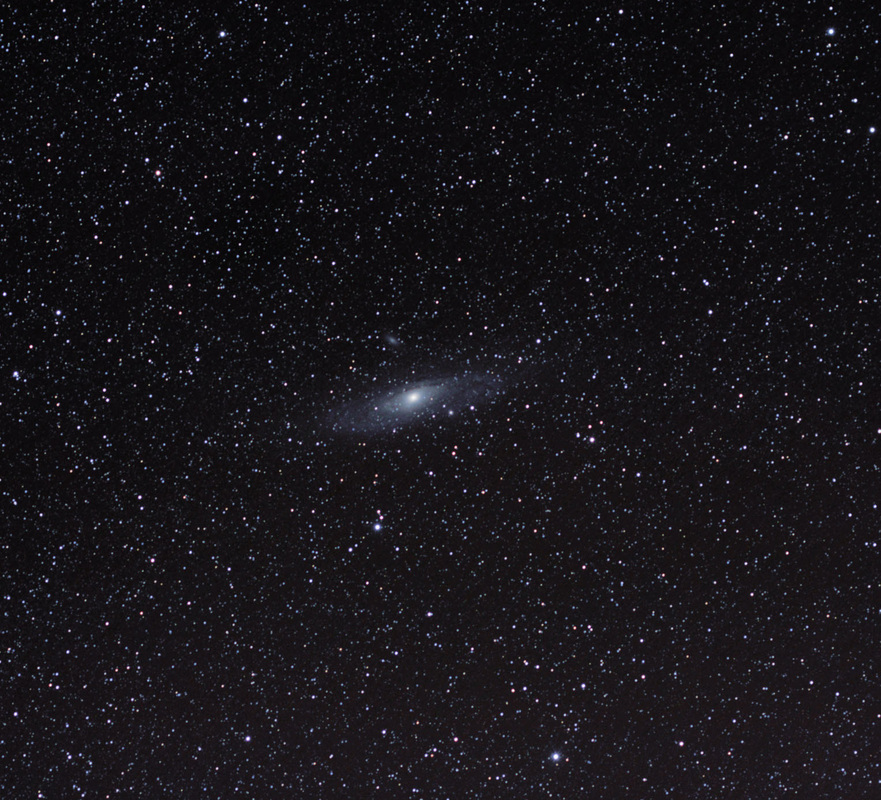 Andromeda Galaxy @ 50mm, 2 minute exposures. My conclusion? The Polarie is a great product and if you are looking for an ultra portable mount for widefield photography then look no further than the Vixen Polarie. Pros -Small, lightweight and ultra portable. -Good battery life using AA's. -Easy to set up and use. -Performs slightly better than estimates given. -Built extremely well. Cons -Polar scope aligning and then reattaching the camera can be fiddly, careful slow movements must be used. -There can be slippage between the mounting block and ballhead at times, again care must be taken to ensure everything is screwed down tight. Overall score out of 10 9.5/10 Hands down one of the best pieces of kit I own and I would gladly recommend everybody else to own too. 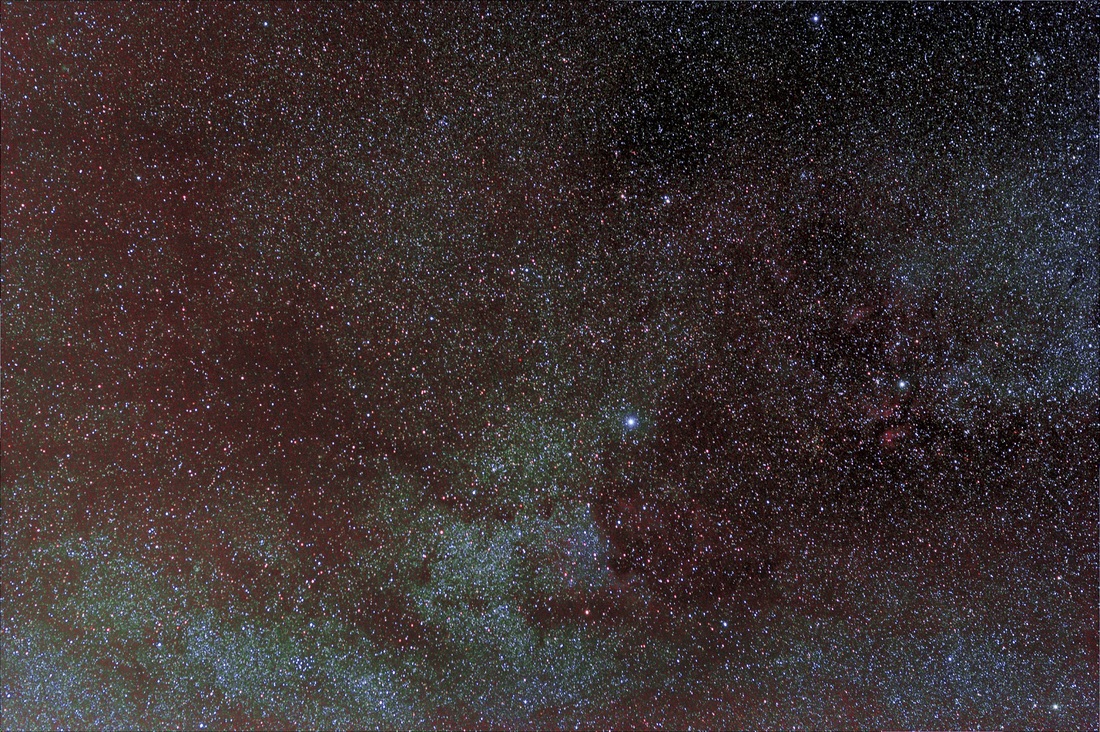 All pictures shown are my own and taken using the Vixen Polarie apart from the two screenshots from the Vixen user manual.
|
Archives
February 2015
Categories
All
|
 RSS Feed
